
If you love flawless makeup application, then the Beauty Blender is probably one of your go-to tools.
However, maintaining this handy sponge in its best condition requires regular cleaning.
Neglecting this can lead to bacteria buildup, skin irritations, and subpar makeup application.
According to Industrygrowthinsights, Beauty Blenders are popular makeup sponges used by professional makeup artists and regular makeup fans. The global beauty blender market is expected to grow at a CAGR of 4.5% during the forecast period, to rea and SD 3.2 billion by 2028.
This guide will walk you through how to clean your Beauty Blender with ease, ensuring a spotless sponge and perfect makeup every time.
Table of Contents
ToggleWhy Proper Beauty Blender Cleaning Matters
Skin Health and Hygiene: Unclean Beauty Blenders harbor bacteria, oils, and dead skin cells, which can transfer back onto your skin, leading to breakouts and infections.
Maintaining the Quality and Longevity of Your Sponge: Regular cleaning ensures your sponge remains soft, absorbent, and lasts longer.
Preventing Makeup Buildup and Streaky Application: A dirty sponge leads to patchy, streaky makeup application. Cleaning keeps your sponge in top condition for smooth, even results.
Part 1: Understanding Your Beauty Blender
What is a Beauty Blender?

A Beauty Blender is a versatile, egg-shaped sponge designed for applying and blending makeup.
Its shape allows for seamless application of foundation, concealer, and other products, especially in hard-to-reach areas like the sides of your nose and under the eyes.
- Different Types of Makeup Sponges: Besides the original Beauty Blender, you can find various sizes and shapes like wedges, silicone sponges, and mini blenders for different purposes.
- Common Uses of Beauty Blenders: From applying liquid foundations and powders to blending cream blushes and contouring, Beauty Blenders are your all-in-one beauty tool.
Why Beauty Blenders Need Regular Cleaning
Absorption of Makeup and Bacteria: Sponges absorb not just makeup but also skin oils, dirt, and bacteria, creating a breeding ground for germs.
Impact on Makeup Application: Dirty blenders can clog pores and lead to uneven makeup application.
Skin Sensitivity and Breakouts: If you’re experiencing frequent breakouts, your unclean Beauty Blender might be to blame.
Part 2: When to Clean Your Beauty Blender
How Often Should You Clean Your Beauty Blender?
Cleaning your Beauty Blender regularly is key to keeping it hygienic and effective.
Daily Spot Cleaning vs. Deep Cleaning:
Daily Spot Cleaning: Ideal for preventing bacteria buildup.
Deep Cleaning: Recommended once a week to thoroughly clean your sponge.
Signs Your Beauty Blender Needs Cleaning:
Your sponge feels slimy or smells bad.
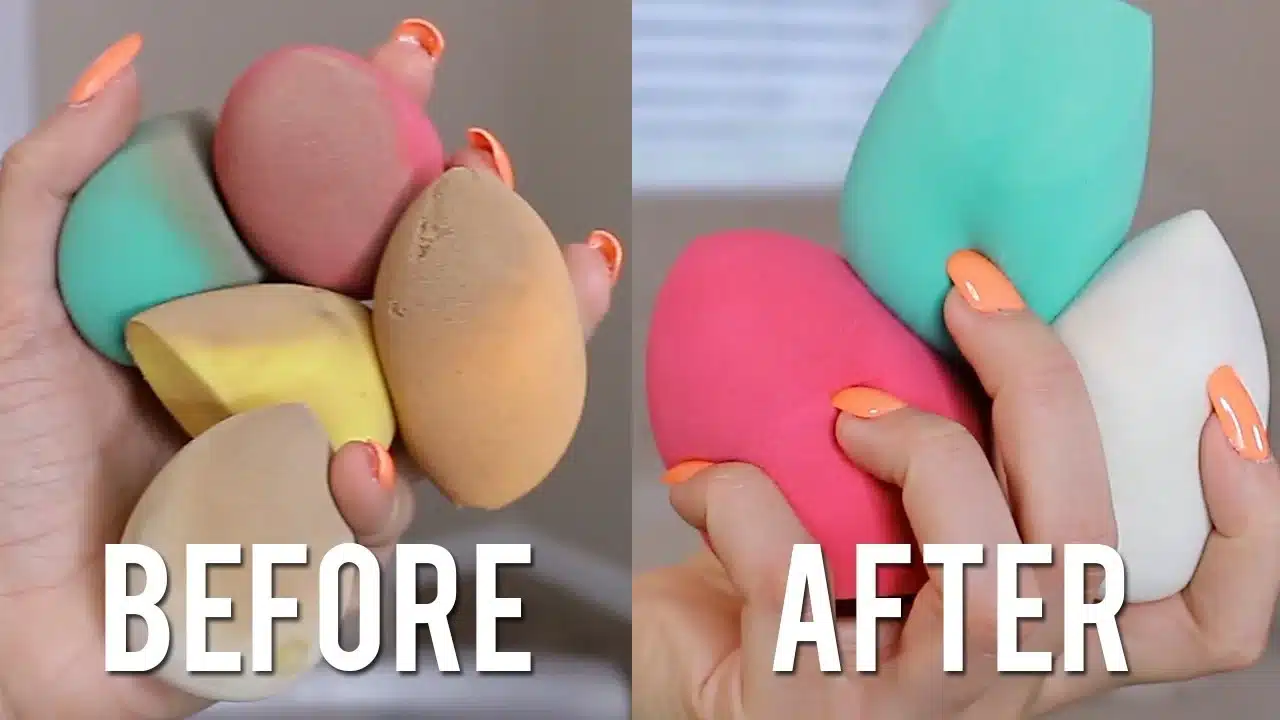
There’s visible makeup buildup on the surface.
Your makeup looks cakey or streaky after application.
Consequences of Not Cleaning Your Beauty Blender Regularly
Bacteria Growth: A dirty sponge can become a hotbed for bacteria, leading to skin irritations.
Shortened Sponge Lifespan: Not cleaning your Beauty Blender regularly can cause it to wear out faster, leading to tears and breakdown of the material.
Poor Makeup Application: Dirty blenders make it difficult to achieve a smooth, even finish.
Part 3: Step-by-Step Cleaning Methods
Daily Spot Cleaning: Quick & Effective Techniques
- Using Beauty Blender Cleansers:
Use cleansers specifically designed for Beauty Blenders to quickly remove makeup after each use.
- DIY Cleaning Solutions:
Mild Soap or Baby Shampoo: Mix with water and gently rub the sponge.
Diluted Vinegar: Works as a disinfectant to kill bacteria.
- Best Tools for Spot Cleaning:
Silicone Scrubbing Mats: These help gently remove makeup without damaging the sponge.
Brush Cleaning Pads: Effective for lathering the cleanser and sponge together.
Deep Cleaning Your Beauty Blender: A Detailed Guide
Pre-Cleaning Preparation:
Wet your Beauty Blender with lukewarm water to open its pores and loosen the makeup trapped inside.
Choosing the Right Cleaning Solution:
Store-bought Cleansers: Formulated specifically for sponges, these offer a thorough clean.
DIY Solutions: Mix mild soap with olive oil to cut through makeup residue.
How to Properly Scrub and Rinse Your Sponge:
Apply a cleanser to your wet sponge.
Squeeze and rub the sponge gently in your palm or on a scrubbing mat.
Rinse thoroughly under lukewarm water until the water runs clear.
How to Clean a Beauty Blender with Soap
Benefits of Soap-Based Cleansers:
Soap works well in breaking down oils and makeup residue. It’s especially good for daily spot cleaning.
Step-by-Step Process:
Apply a small amount of soap to the sponge.
Massage the sponge gently to create a lather.
Rinse thoroughly and repeat if necessary.
Ideal Soap Types:
Antibacterial Soaps: Keep bacteria at bay.
Fragrance-Free Soaps: Prevent irritation for sensitive skin.
How to Clean a Beauty Blender with Olive Oil and Soap
For deep cleaning or removing heavy foundation, combining olive oil and soap works wonders.
Removing Stubborn Makeup and Oils:
Olive oil helps break down stubborn makeup and oil buildup trapped in the sponge.
Step-by-Step Process:
Mix a small amount of olive oil with soap.
Apply to a wet sponge and massage thoroughly.
Rinse with warm water until all the oil is gone.
Part 4: Alternative Cleaning Techniques
Using a Microwave to Disinfect Your Beauty Blender
The microwave method is a great way to sanitize your sponge quickly.
How It Works:
The heat kills bacteria while loosening makeup residue.
Detailed Step-by-Step Process:
Soak the sponge in water inside a microwave-safe cup.
Microwave on high for 1 minute.
Let it cool down before squeezing out the water.
Safety Precautions:
Always ensure the sponge is fully soaked in water to avoid burning.
How to Clean a Beauty Blender with a Washing Machine
When to Use a Washing Machine:
Great for cleaning multiple sponges at once, but not recommended for frequent use.
Preparation and Protective Measures:
Place sponges inside a mesh laundry bag to protect them from damage.
Cleaning Cycle Recommendations:
Use a gentle, cold wash cycle without detergent.
Part 5: Drying and Storing Your Beauty Blender
How to Properly Dry Your Beauty Blender
Air-Drying Techniques:
After cleaning, allow your sponge to air dry in a well-ventilated area. Avoid placing it in a damp, enclosed space as it can lead to mold growth.
Avoiding Dampness and Mold:
Use a clean towel to pat the sponge and speed up drying time.
Best Practices for Storing Your Beauty Blender
- Keeping It Clean Between Uses:
Store in a breathable case to avoid bacteria buildup.
- Storage Containers and Holders:
Choose holders that allow airflow, such as mesh cases or Beauty Blender drying stands.
- Avoiding Contaminated Surfaces:
Never leave your sponge directly on bathroom counters or makeup bags where bacteria can spread.
Part 6: Maintaining Your Beauty Blender for Longevity
How to Keep Your Beauty Blender Clean for Longer
- Preventing Stains and Residue Buildup:
Always clean your sponge immediately after use to prevent makeup from drying and staining the sponge.
- Routine Maintenance Tips:
Use a Beauty Blender solid cleaner for weekly deep cleans and store it in a dry, ventilated space.
When to Replace Your Beauty Blender
- Signs It’s Time for a New Sponge:
Visible tears or crumbling.
Persistent stains or bad odor despite cleaning.
- Average Lifespan of a Beauty Blender:
Depending on use and care, replace your sponge every 3-6 months for optimal performance.
Part 7: Common Mistakes to Avoid When Cleaning a Beauty Blender
Using Harsh Chemicals
- Potential Damage to Sponge and Skin:
Avoid bleach or harsh cleaning agents as they can break down the material and cause skin irritation.
Over-Scrubbing and Tearing the Sponge
- How to Be Gentle Yet Effective:
Always use gentle, circular motions and avoid pulling or twisting the sponge to maintain its shape and durability.
Not Rinsing Out Soap Completely
- The Risk of Leaving Residue Behind:
Leftover soap can cause skin irritations. Ensure that you rinse the sponge thoroughly until no soap bubbles remain.
Also Read These Related Articles:
Conclusion: How to Clean a Beauty Blender
Regularly cleaning your Beauty Blender not only keeps your skin healthy but also ensures flawless makeup application.
By following these cleaning methods, you’ll extend the lifespan of your sponge, avoid breakouts, and enjoy smooth, streak-free makeup every time.
If you found this post helpful, please share it with your friends and fellow beauty enthusiasts! We’d love to hear your thoughts, so feel free to leave a comment below if you have any questions or additional tips.
Don’t forget to subscribe to our email newsletter to stay updated with the latest beauty tips, tricks, and exclusive content right in your inbox!